How to add right click Power option in your PC
Almost all computer users need to restart, shut down or hibernate their systems at some time and doing all these things were easy enough in previous Windows versions such as Windows XP, Vista and 7. But suddenly Microsoft introduced Metro UI in Windows 8 and removed the Start button and Start menu from Windows 8. Although you can get start button and start menu back using this tutorial but that's a different thing.
Many Windows 8 users are facing problems in getting used to this new Metro UI and Start Screen and the most difficult part of this new interface is the missing power options. There is no direct option given to restart, shut down, hibernate and sleep.
Oh yeah, you can select these options using new Charms bar or by clicking on Taskbar and pressing "Alt+F4" key combination or by pressing "Ctrl+Alt+Del" keys together to choose a power option from the given list. There are a few other known ways as well but why do we need to follow so many steps? Why not provide a direct option for such an essential task? Believe me selecting these power options from start menu was far better and easier.
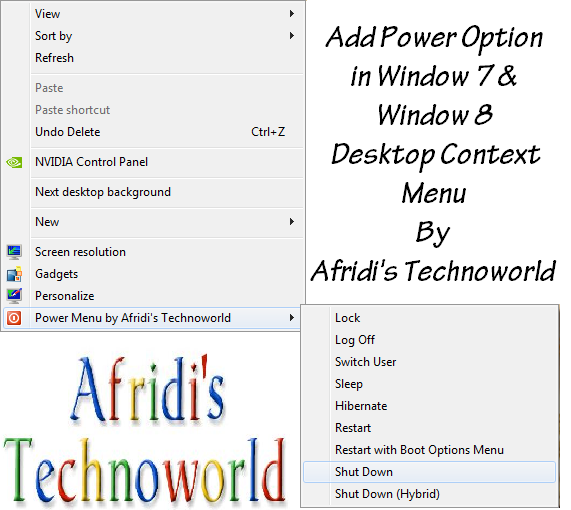
In this tutorial, we'll tell you how to add a new cascading menu in Desktop context menu (right-click menu) which will provide easy and direct access to all following power options as shown in the figure below:

Using this new menu, you just need to right-click on Desktop and select the desired power option to immediately restart, shut down your system or do other above mentioned stuff as shown in the picture.
As you can see in above screenshot, you get all power options in this new cascading menu which makes it really easy and convenient to restart or shut down your computer system.
Step 1: You just need to download the Rar file from the link given below.
Step 3: Run the extracted "Add Power Menu.REG" file. It'll ask for confirmation, accept it as shown in the picture given below.
Step 4: After that Press OK as shown in the picture given below:
Almost all computer users need to restart, shut down or hibernate their systems at some time and doing all these things were easy enough in previous Windows versions such as Windows XP, Vista and 7. But suddenly Microsoft introduced Metro UI in Windows 8 and removed the Start button and Start menu from Windows 8. Although you can get start button and start menu back using this tutorial but that's a different thing.
Many Windows 8 users are facing problems in getting used to this new Metro UI and Start Screen and the most difficult part of this new interface is the missing power options. There is no direct option given to restart, shut down, hibernate and sleep.
Oh yeah, you can select these options using new Charms bar or by clicking on Taskbar and pressing "Alt+F4" key combination or by pressing "Ctrl+Alt+Del" keys together to choose a power option from the given list. There are a few other known ways as well but why do we need to follow so many steps? Why not provide a direct option for such an essential task? Believe me selecting these power options from start menu was far better and easier.
In this tutorial, we'll tell you how to add a new cascading menu in Desktop context menu (right-click menu) which will provide easy and direct access to all following power options as shown in the figure below:
- Lock
- Log Off
- Switch User
- Sleep
- Hibernate
- Restart
- Restart with Boot Options Menu
- Shut Down
- Shut Down (Hybrid)

Using this new menu, you just need to right-click on Desktop and select the desired power option to immediately restart, shut down your system or do other above mentioned stuff as shown in the picture.
As you can see in above screenshot, you get all power options in this new cascading menu which makes it really easy and convenient to restart or shut down your computer system.
Step 1: You just need to download the Rar file from the link given below.
Download Links:
Step 2: Extract it using WinRar
Note: If you don't have WinRar to Extract the Rar file then Download it from the link given below
Step 3: Run the extracted "Add Power Menu.REG" file. It'll ask for confirmation, accept it as shown in the picture given below.
Step 4: After that Press OK as shown in the picture given below:
If you want to remove the new "Power Menu" in future, you can run the "Remove Power Menu.REG" file included in the Rar file that you had downloaded. It'll remove the menu.
If this was useful to you then I would ask a favour from you all to like and share it on facebook, tweet it on twitter or Recommend this on google+.
Keep visiting
Thank you :)
 If you like my posts please comment as they motivates me to post more..


